How To Make Bluestacks Run Faster On Your PC
This is a quick tutorial on how to make Bluestacks run faster on your PC. I will increase the size of RAM in BlueStacks, it can make computer faster when running Bluestacks. |
| How To Make Bluestacks Run Faster On Your PC |
The size of BlueStacks RAM depends
on your PC RAM, so you make sure that your PC system has sufficient amount of
RAM to allocate a greater amount of Bluestacks RAM. Don’t set the new size of BlueStacks
RAM to more than half of your PC RAM, which will keep your PC stability
unchanged.
5 Steps To Make Bluestacks Faster
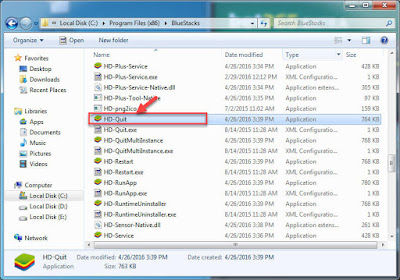
Step 1. Go to the folder C:\Program Files\BlueStacks and
run the file “HD-Quit.exe” to stop all BlueStacks services and
processes.
Step 2. Press Windows key + R to open the Run dialog box.
Then you type "Regedit", then click on OK to open the Registry
Editor.
Step 5. You change the Base option to Decimal mode. Input the
value you want to allocate (in megabytes) for RAM into the Value data field,
click OK and exit Registry Editor.
Note: If we enter the value of 1024
(1 GB), the BlueStacks RAM size will be increased to 850 MB.
Now launch your BlueStacks
application and check the size of your new RAM. If you do not see any changes,
restart your PC and re-check.
See also: 3 Methods To Play Android Games on PC Windows
See also: 3 Methods To Play Android Games on PC Windows
Above I have share How to Make
Bluestacks Run Faster On Your PC. I hope you also share this guide with
your friends and family over the social network. It’s also the best way to
which you can let others support me! Thank you.


No comments:
Post a Comment